Welcome to Pokin' Holes.

This blog is all about target shooting. Nothing is more fun that pokin' holes into paper targets! I use a variety of guns for this purpose. I have air rifles, handguns, rimfire and high power rifles, and shotguns. I am not a hunter. I simply enjoy the sport of target shooting.

I have created several targets that you can print and use. They are in PDF format. NOTE: When printing, don't let your PDF viewer resize the image. This will retain the original dimensions.


Air Rifle

Pistol

Scope

I have also created a specialty target just for the AK47 and SKS rifle. This target will help you sight in your rifle at 25-yards and be dead on at 100-yards.


AK47 / SKS

Feel free to use and distribute these targets. I hope you enjoy your visit here. Feel free to comment on the articles.
Showing posts with label rimfire. Show all posts

Thursday, February 4, 2010

Accessories: Barska Ruger 10/22 Flash Hider

blank-1x1-transparant111111111Ruger-Logo I have been adding accessories to my Ruger 10/22 rifle.  In addition to the fantastic Tapco Intrafuse 10/22 stock, I added a Barska Muzzle Brake/Flash Hider.  This is marketed under several brand names, but, I think they are all the same. 

Does a .22 rifle need a muzzle brake or flash hider?  No, but I think it looks good on my Ruger 10/22 Taptical (Tapco Tactical) rifle!  And at only $10.00 on sale at Amazon.com, it was a very affordable addition.

Barska-Ruger-1022-Flash-Hider The quality of the body is very good, but, the set screw and supplied Allen wrench are crap!  The metal is so soft that it easily strips when you try to tighten it enough to stay in place.  It happened to me.  The hex opening at the top of the set screw deformed enough to not allow it to be tightened.  No problem!  Just head down to the hardware store and get a new one. 

I first tried the “big box” hardware stores.  What a waste of time.  They don’t have crap as far as true “hardware” goes!  They suggested to try an auto parts store.  I tried one of those, too!  They suggested to try a local hardware store.  You know, one of those that have been around for decades and have several rows of screws, nuts, bolts, and any imaginable connector.  Luckily, there was one in town.

Sure enough, they were able to match the set screw.  It took a while, but the person helping me would not give up.  It is an unusual size, but, here it is in case anyone reading this has the same problem:

4mm x 5mm x .70-thread

The metal on these U.S. made set screws are very hard.  They didn’t show any signs of weakening when I really put the torque to it.  I will post a review of this and other accessories on an upcoming review of the Ruger 10/22 Taptical rifle.

Sunday, October 25, 2009

Beretta U22 Neos shooting session

blank-1x1-transparant

pistol-thumb I went out Saturday with my “newest, new” Beretta U22 Neos.  I call it that because it is the second new one I have had.  As written in previous posts, I purchased the U22 and had a small problem right out of the box.  The rear sight would not adjust.  I hesitated sending it back to Davidson’s because it shot so darn well!  I wondered if the replacement would shot like the first.

Beretta-U22-Neos

Beretta U22 Neos .22LR Target Pistol

I don’t think it’s luck.  I think Beretta has made a near perfect .22-target pistol.  The second one shoots just as good as the first.  I have owned and do own .22LR semi-automatic pistols.  I have read many reviews of such and there is always one reoccurring theme.  They can be picky about the ammo you feed it!.  I used to own a Ruger Mark II pistol.  I loved the gun and kick myself for selling it.  It was very accurate, but, you had to feed it a particular brand and type of ammo to get consistent feeding.  Even so, there was an occasional hiccup.  The same can be said about the Taurus PT22 I have.  If I try to feed it anything other than CCI Mini-mags, it will not feed well.

The Beretta U22 Neos breaks the mold!  I have fed it several types of ammo.  I have fired over 500-rounds through two different pistols without even one malfunction!  Beretta has got it right.

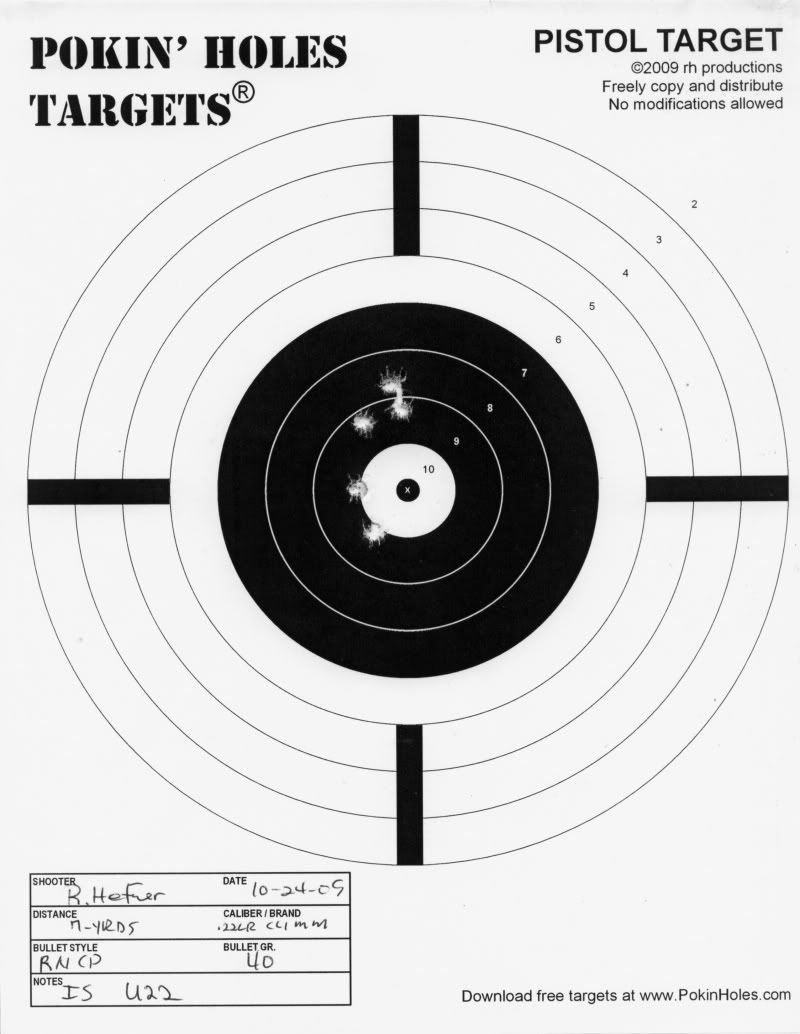
My older eyes don’t get along with iron sights.  I usually try to add a red-dot scope to the firearm if possible.  But, I wanted to give the U22’s iron sights a try.  I did much better than I thought I would!  Here is an example:

20091024-22LR-BERU22NEOS-CCI-RNCP-40GR-7yrds-424X417

Five rounds from a Beretta U22 using iron sites at 7-yards.

Not bad!  The U22 has a Weaver-type rail system so why not add a red-dot scope?

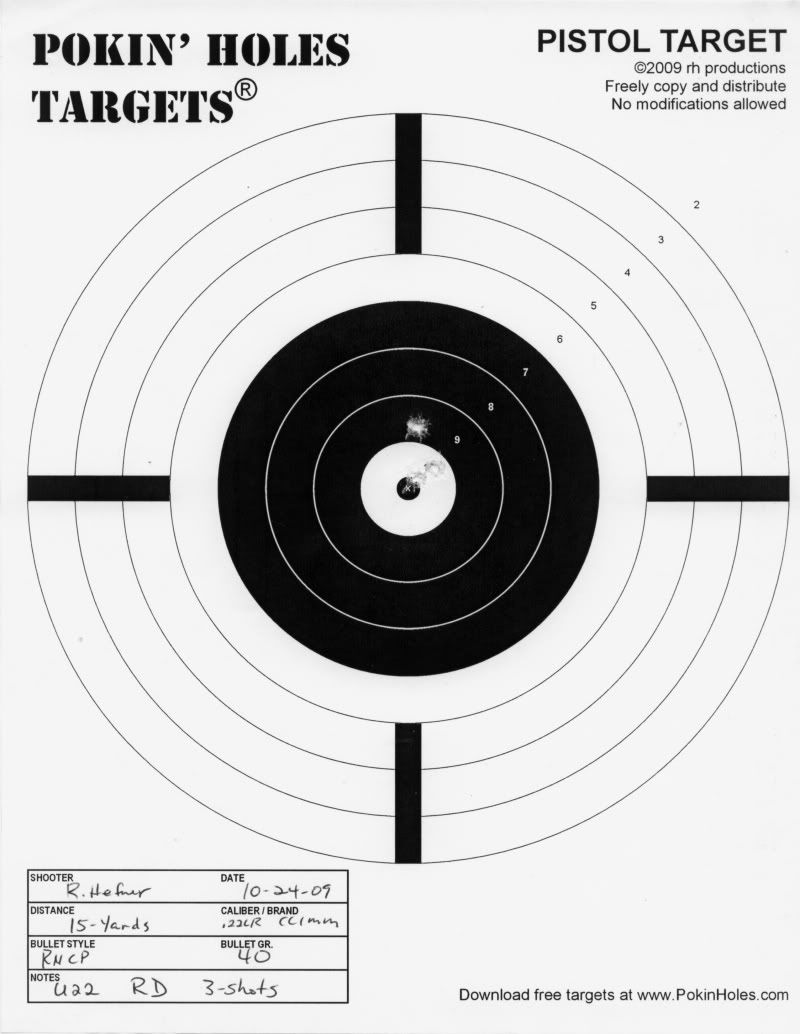
I added my cheap red-dot scope I have used on other guns.  It’s is no where near the quality of a EOtech or AimPoint, but, it serves my purposes.  Here are the results using the red-dot scope:

20091024-22LR-BERU22NEOS-CCI-RNCP-40GR-7yrds-424X419-2

Three rounds from a Beretta U22 using a red-dot at 15-yards.

WOW!  I doubled the distance and reduced the pattern by half. 

I just love my new Beretta U22 Neos.  It is fun and inexpensive to shoot.  I can see that if you used a 4-power scope, you could make decent shots at 50-yards and beyond.  I will be on the lookout for such a scope. 

If you are in the market for a .22LR target pistol, consider the U22.  It sells for around $250.  I would highly recommend getting it through Gallery of Guns.  They can ship it to your local FFL dealer and you will have the “lifetime replacement guarantee”.

Sunday, October 4, 2009

The Beretta U22 Neos. Affordable fun!

blank-1x1-transparant pistol-thumb Well I went out and did it.  I bought a new gun!  With the expense of ammunition, I needed something affordable to shoot.  I was looking for a .22LR target pistol.  I had narrowed it down to either the Ruger 22/45 MKIII or the Beretta U22 Neos.

Many years ago, I owned a Ruger MKII with the bull barrel.  This was the steel frame model.  This pistol was a joy to shoot.  It was very accurate.  The grip was angled like the old Luger pistol.  This is viewed by many to be the perfect angle for natural aiming.  The workmanship on the Ruger was top-notch.  But I was looking for something a little different.

Ruger_mkiii_bull

Ruger MKII With Bull Barrel

I have had a Beretta pistol before; the 92F.  It was one of the finest pistols I have ever owned.  I was very impressed with the craftsmanship of the gun.  Beretta also makes a .22LR plinker.  The U22 Neos.

Baretta-U22-Neos-003

Beretta U22 Neos

The Neos is Greek for “new”.  And by looking at the gun, new is a good description.  It looks like something out of a Star Wars movie.  Just because it has the Beretta name on it doesn’t mean it is a good pistol, so I did some research on it.  I didn’t find anything negative about the Neos.  Just the opposite.  Everything I found points to a well made and fun to shoot pistol.

Baretta-U22-Neos-001

The Ruger 22/45 and the Beretta U22 Neos both have polymer frames.  Both are about the same weight.  Both reliable and made well.  So what made me choose the Beretta?  Two things made me gravitate towards the Beretta Neos.  First, it has the same grip angle as the more expensive Ruger steel frame pistol.  Second, the Beretta is by far easier to field strip and maintain.  If you ever owned a Ruger 22 semi-automatic pistol, you know that it can be a bear to take down and reassemble.  I know a story of someone who sold the Ruger pistol cheap because he couldn’t reassemble it! 

Ruger-22-45-MKIII

Ruger 22/45 MK III Pistol

The Beretta U22 Neos is a breeze to take down and reassemble.  It is a much simpler and modern design.  The Ruger 22 has been around for quite a while and has changed very little.  Unlike the Ruger, the Neos is a striker fire design.  This cuts way down on complexity of design.

Baretta-U22-Neos-004

Beretta U22 Neos Striker Fire System

Both pistols were selling for the $250 level and both are very well made high-value pistols.  The two things that sealed the deal for the Beretta was the ease of field stripping and the styling.  You just gotta love the looks of it!

When my new pistol arrived I noticed that the fit, finish, and quality was as I expected from Beretta.  It was just fantastic.  The feel of the action was solid.  The angle and contour of the grip fits naturally in my hand.  This makes makes aiming effortless.  There was one problem that I have found, though.  The Neos has an adjustable rear sight, but the windage adjustment screw will not budge!  Beretta supplied an adjustment tool that has a flat head screwdriver for adjusting the sight.  I used enough pressure to break the tool trying to adjust the sight.  I have emailed Beretta to see how to get this fixed.  I am sure they will correct the problem.

As you can see in the pictures in this article, the Beretta U22 Neos has a Weaver-type rail attached to the barrel.  This is important as I have mentioned in previous postings that my “old” eyes don’t like iron sights.  I added the red/green dot scope that I used on my Marlin rifle.  I just love it!  As you can see by the target, it allows me to shoot very accurate…Even with old eyes!

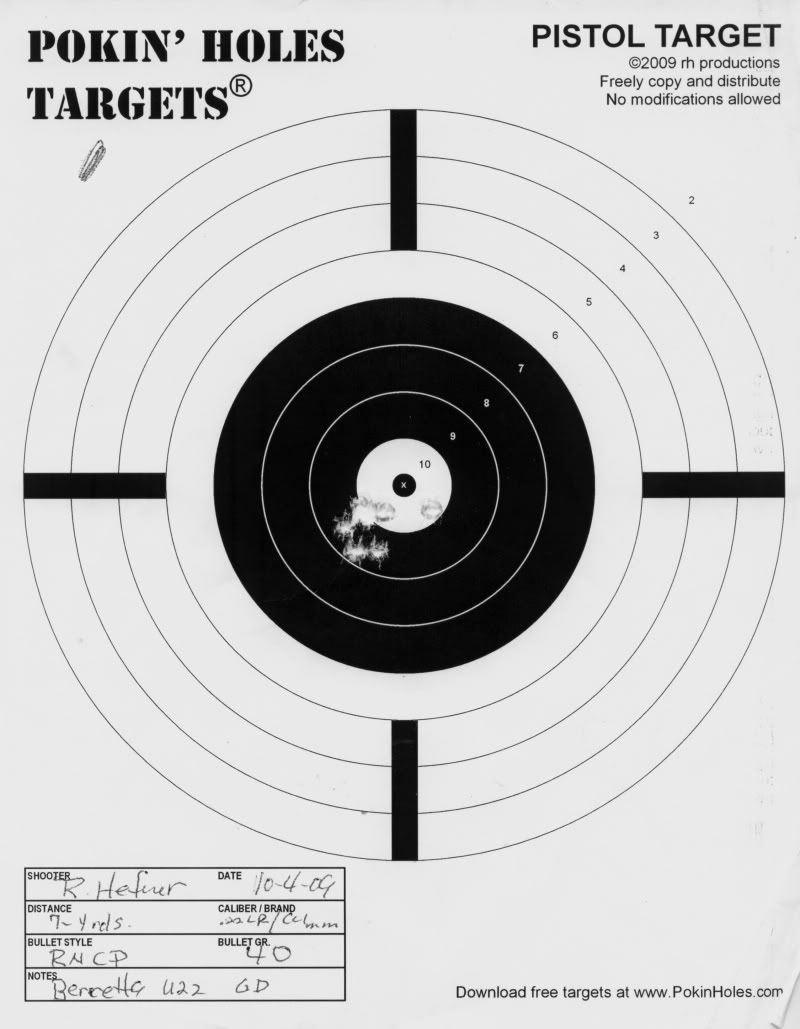
20091004-22LR-BERU22NEOS-CCI-RNCP-40GR-7yrds-424x416

10-Rounds at 7-yards using CCI Mini-Mags

The target above shows a 10-shot group at 7-yards.  The white circle is 1-inch in diameter.  I am not the best marksman around.  I am very impressed with the performance of the Beretta Neos.  I shot at 25-yards and got most of the rounds in the 4-inch black circle.  I will work on that!

On the two days of shooting the Beretta U22 Neos, I fires about 300-rounds.  I used three types of ammo.  CCI Mini-Mag round nose 40GR copper coated bullets, Winchester Super Speed round nose 40GR copper coated bullets, and Federal 36-grain hollow point copper coated bullets in the bulk pack.  It fed all three types of bullets without even one malfunction.  Out of the box, the Beretta was 100%.  As usual, the CCI Mini-Mags shot best, but not by much!  Even the cheaper Federal ammo performed well with the Beretta.  The reliability may in part be due to the Beretta magazines.  These are fantastic and among the best I have ever seen for a handgun.  The spring and follower are extra smooth in operation and the finish of the magazine body is superb.  Good job, Beretta!

Now that I have the scope zeroed in, I can take it in the woods and plink!  I love shooting the steel reactive targets with a .22 pistol or rifle.  The red/green dot scope will make target acquisition fast and accurate.  And being a pistol shooting the .22LR round, I can shoot all day and not break the bank!

It has been a long time since I owned a .22 target pistol.  I look forward to shooting thousands of rounds through it.  Hey, trigger time is trigger time!  I love shooting .22’s as much as the bigger rounds.  And with the cost savings, I can participate as often as I like.

Note:  All images except the target have been borrowed from the internet.

Monday, September 21, 2009

Shooting the Marlin model 60 rifle

blank-1x1-transparant pistol-thumb The oldest rifle I own is the Marlin model 60.  This is an inexpensive .22LR semi-automatic rifle.  It holds 18-rounds in the tubular magazine.  I don’t know exactly, but I think I have owned this rifle more than 20-years. 

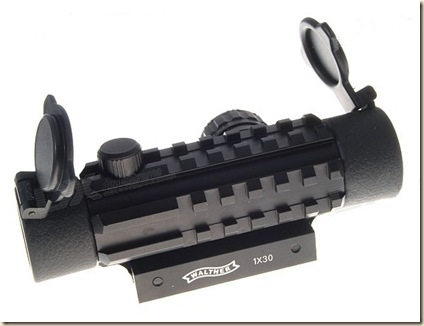
I added a red/green dot sight to it.  As I mentioned before, my old eyes don’t like iron sights.  I found a cheap Walther 1x30 red/green dot scope that will either mount to a Weaver/Picatinny rail or the grooved receivers on many .22 rifles.  All you have to do is reverse the built in mount.  This sight is non-magnified and is great for quick and accurate target acquisition.

Walther-1x30-red-green-dot

The Walther 1x30 red/green dot scope works great on my Marlin 60 .22 rifle.  It has Picatinny rails on it to attach a laser or light.  There is a dot size and color selector.  I think the dot is about a 5-MOA size dot.  At 25-yards, the dot covers about two-thirds of a 4-inch circle. 

Marlin 60

The Marlin model 60 is just a fantastic little tack driver.  The wood stock is cut for an adult length of pull and had a nice cheek weld.  The iron sites are “ok”, but you start to see its true potential when you add a scope.  The barrel has what is called “micro-groves”.  This has 16 smaller grooves that is marketed to be more accurate.  I can attest to that fact! 

Yesterday, I tried three different brands of ammo.  The Federal 36-grain hollow point in the bulk pack.  You know…The cheap stuff at the mart store.  The Winchester Super Speed round nose.  This is 40-grain copper plated ammo that is traveling at around 1300 FPS.  The last is the CCI Mini-mag which is 40-grain round nose, copper plated ammo. 

I was not surprised by the cheap Federal bulk pack ammo.  It is fun to shoot, but not very accurate.  I was shooting about 4-inch groups at 25-yards.  I guess you get what you pay for.

A big surprise was the Winchester Super Speed ammo.  The ammo fed 100% but wasn’t as accurate as I expected.  It shot about 2-1/2-inch groups at 25-yards.

The CCI Mini-mag ammo really shinned…Again!  This ammo is the most consistent .22 LR ammo I have every used.  I get the same results from a box I buy today as one from last year.  It cycles 100% and gives consistent accuracy performance.

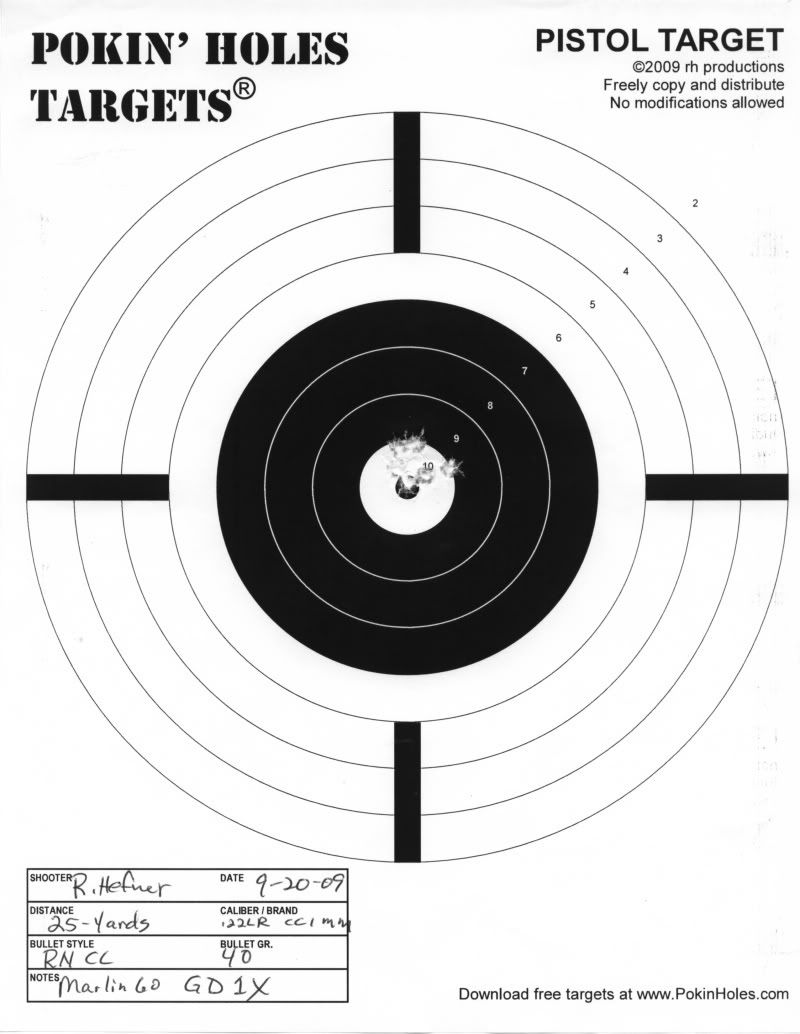
20090920-M60-CCIMM-25-Yards-6-shot-420x407

In the image above, the white circle is 1-inch in diameter.  What you see is a 1/2” group using a 5-MOA green dot non-magnified scope on the Marlin model 60 .22 LR rifle at 25-yards from a seated position.  Click on the image to see the full target.

The Marlin 60 rifle has always been very accurate.  More accurate than anything I have.  When using good ammunition like the CCI Mini-mags, you can drive tacks!

Sunday, September 20, 2009

Taurus PT-22 magazine modification

(Click on any image to enlarge)

I have had a Taurus PT-22 “pocket pistol” for many years.  It has served me well, but I have noticed a certain “quark” that I have finally fixed.

The factory magazine for the PT-22 has a finger grip extension.  For those with smaller hands, I guess this would work well, but, my pinky finger puts pressure on it skewing the alignment ever so slightly.  This sometimes causes misfeeds.  To solve this problem I would drop my pinky finger below the extension relieving the pressure.   I was afraid that if I ever had to use the pistol for its intended purpose, I may be under enough stress to forget this “solution”. 

Taurus-PT-22-002

The picture above depicts the Taurus PT-22 and magazine as it originally came from the factory with the exception of the fine Pearce wrap-around rubber grip.  Notice the grip extension on the bottom of the magazine.  I never did like it.  Now I have solved the problem.

Use an Allen wrench or punch to disassemble the magazine.  I think most of you know how to do this so I will not go into great detail.

Taurus-PT-22-Mag-003

Use caution when removing the floor plate from the magazine.  The spring will shoot across the room if you don’t retain it with you finger.  You now have the magazine disassembled enough to make this minor modification.

Taurus-PT-22-Mag-004

Take a flat head screwdriver to remove the screw holding the plastic magazine extension to the metal floor plate.  Now separate the floor plate from the magazine extension.  Keep the screw and magazine extension as you may want to put it back the way it was later.

Taurus-PT-22-Mag-Ext-005

Now reassemble the magazine.  There will be a “dimple” protruding from the bottom of the metal floor plate that is only cosmetic and causes no functioning problems.  Here is the finished project.

Taurus-PT-22-007

Taurus-PT-22-008

The removal of the magazine extension makes the gun more comfortable for me.  The overall size is reduced, a little, which only helps it to be a more effective concealed-carry weapon.

I really enjoy the Taurus PT-22 pistol.  It makes a good “summer” carry gun.  Some think that .22 LR rounds are underpowered.  They are right!  Most pistol ammunition are underpowered.  This pocket rocket is very accurate up to 7-yards.  I can routinely get all nine rounds in a 3-inch group at 7-yards.  And this is handheld and semi-rapid firing.  I feel safe with my little friend!

Tuesday, July 7, 2009

Ammo!


(Click on any image to enlarge)

There is one thing that is as elusive as UFO's, Big Foot, And the Loch Ness Monster. Ammunition! Some calibers are so rare, you just buy it without question when you see it.

Today, I went to Wally World to see if they received a shipment. To my surprise They had a couple boxes of Winchester 9mm 115-grain FMJ 100-round Value Packs. "I'll take both!" They also had the Federal 550-round .22LR bulk packs. "I'll take one of those, too!"

Maybe the ammo shortage is starting to come to an end. Let's hope so. But, for now, I can go out and poke a few holes with my 9mm pistols. It's been a while. Time to give them a workout.

Wednesday, May 20, 2009

Shooting Session With The Taurus PT-22


(Click on any image to enlarge)


As mentioned earlier in this blog, I had sent my Taurus PT-22 out for repair. Taurus replaced the slide under the lifetime warranty at no charge. I finally made it to the range to make sure everything function properly. Everything works great!

I shot at several distances from 3-yards to 7-yards. This is what I feel is the effective range for this firearm. The Taurus PT-22 is not a target pistol. It is a compact, concealable, personal protection weapon. It that role it is more than adequate.

Some say that a semi-automatic pistol firing .22-caliber rimfire ammunition is not reliable. This is too much of a blanket statement to be true. I have found that up to 125-150 rounds, the Taurus PT-22 functions perfectly, but after this amount of shots, the gun gets sufficiently "dirty" and will have some failure-to-feed malfunctions. I have had the Taurus PT-22 for over a decade and this has been true from day one! I don't see this as a problem since I clean my guns often and usually after every firing session. I carry this pistol concealed from time-to-time when a larger pistol is not practical. If I ever have to use it for its intended purpose, I don't forsee shooting more than 18-round anyway!

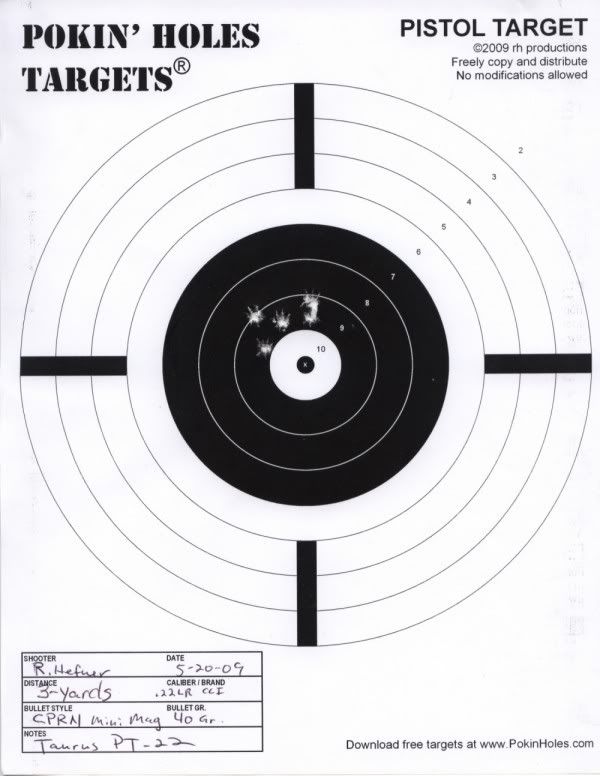
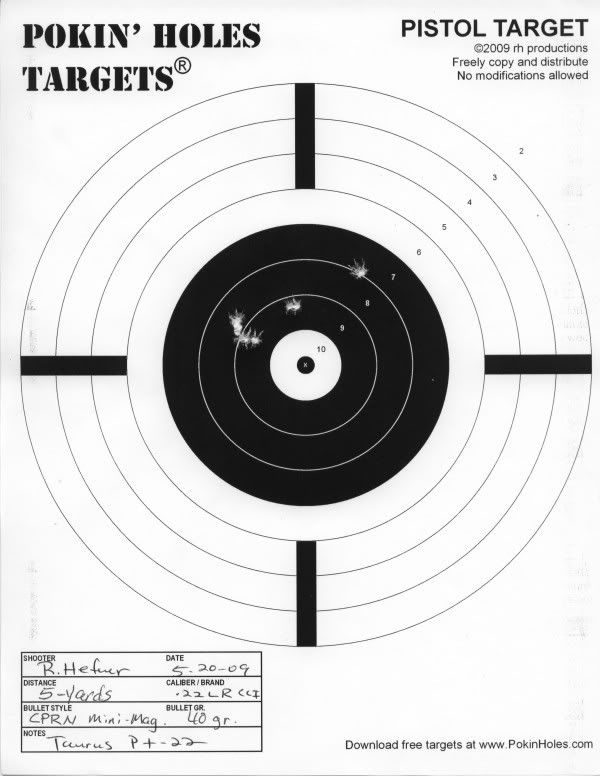
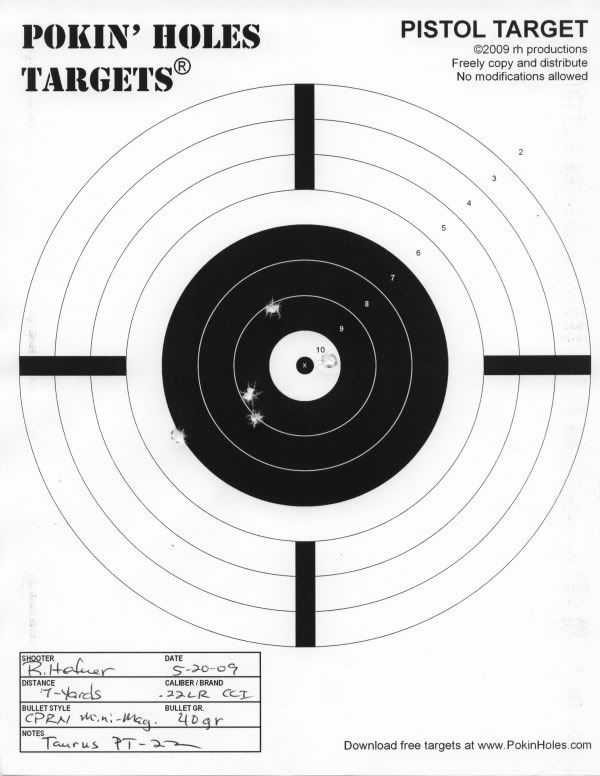
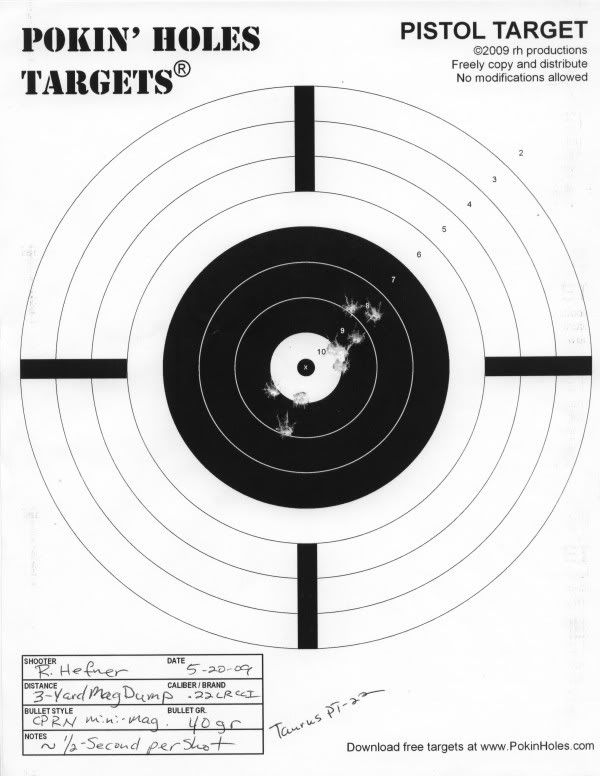
I have a few targets to show you. I started at 3-yards and fired a 5-shot group. I then moved it to 5-yards and 7-yards. I ended with a 9-shot magazine dump quick fire (1/2-second per shot) at 3-yards. Here are the results. Note: For scale, the center "white" circle is 1-inch in diameter. Each ring out for the center is in 1-inch increments. So the center "white" circle is 1-inch, the next ring is 2-inches, etc.


3-Yards, 5-Shots


5-Yards, 5-shots


7-Yards, 5-Shots


9-Shot Magazine Dump
Quick Fire (1/2-second per shot)
3-Yards


I am very happy with the Taurus PT-22. I am not the best marksman. I am getting old, fat, and blind! That being said, the results show that the average shooter can expect 3-inch or less groups up to 7-yards. The quick fire magazine-dump at 3-yards really blew me away. I simply presented the weapon to the target and fired quickly. Yes, the .22-caliber cartridge is an underpowered round. But, most every handgun cartridge is! I think 9-rounds in a group that small will do the job.

As mentioned, I have had it for quite a while and have fired over 2000-rounds through it. It still looks and functions great thanks to proper care and the lifetime warranty. One final note about most .22-caliber handguns. They are usually finicky about the ammo you feed it. You will probably have to try several brands and loads before you find the right match. I found the best results with CCI Mini-Mag High-Velocity copper plated round nose bullets. Many purest will say to use hollow points, but with a .22-caliber long rifle shell, I feel penetration is more important than expansion. That's why I don't use hollow points in this caliber.

Thursday, May 14, 2009

New Scope On My Savage Mk. II Bolt Action Rifle


(Click on any image to enlarge)


I have a Savage Mark II .22-LR bolt action rifle. I wanted to add a scope to it, but didn't want to break the bank. Why put a $200 scope on a $150 rifle?

I found a company in Hong Kong that sells directly to consumers. They have a few scopes and some mounts. The scope has the "Bushnell" labeling, but I think it is a knock-off. No matter, because the price is right. I paid $43 for this scope including shipping! I needed a set of rings to mount to the dovetailed receiver. Luckily, the same company had them for $4. Click on the links to see them.

I followed standard mounting procedures for the scope and focused the eyepiece. I took the rifle outside to do an "old-fashioned" bore sighting of the scope. I removed the bolt and viewed down the bore and lined-up on a point about 100-yards away. I then adjusted the scope to point to the same spot. This will get me close.

I took my newly scoped rifle to the indoor range at the Springs Road Gun Club. I mounted one of the "Pokin' Holes" scope targets and ran it back 25-yards to the back wall. I loaded up my favorite .22-LR round, CCI Mini-mag High Velocity copper-coated 40-grain round nose bullets and fired five rounds. I was only about 4-inches off. Not a bad bore sighting! After a few adjustments I got the zero dialed in. Now I will fire a 10-shot group and see how the new scope setup works.


I was very happy with the results. The first shot was the "flier" left of center. I saw it through the scope and said a few, not so nice words. I settled down and fired the remaining nine rounds. Disregarding the first "flier", the grouping measured 5/8-inch, center-to-center. I'm sure a more accurate shooter could have cut that in half!

This new scope really looks great on my Savage rifle. The initial results are better than expected. Remember, I only have about $50 in the scope and rings! I look forward to many plinking and target shooting sessions. Next, I will take the rifle outside and try ranges up to 100-yards. Look for future reports!